Saturday, 28 June 2014

DIY Curtains & save money

How to make Cafe Curtains for under $15?

When I first lay my eyes on this beautiful fabrics at Spotlight 2 weeks ago, I just fall in love with it.  It is just so simple but artistic at the same time.


I wanted to update the curtains in one of the rooms and this fabric just suit it so well.  My sewing skills are not that fantastic so I decided to make

Cafe Curtains 


Now the problem is that the vertical length of the fabric is too short for the window so I decided to choose another fabric to contrast it on the top while making the casing for the rod.


So now my easy step-to-step guide:
1. Measure the length and width of your window.  And cut the fabric as required.  I cut the total width of the whole window and pin it in half width wise before cutting it making 2 panels.


2. Hem the fabric.

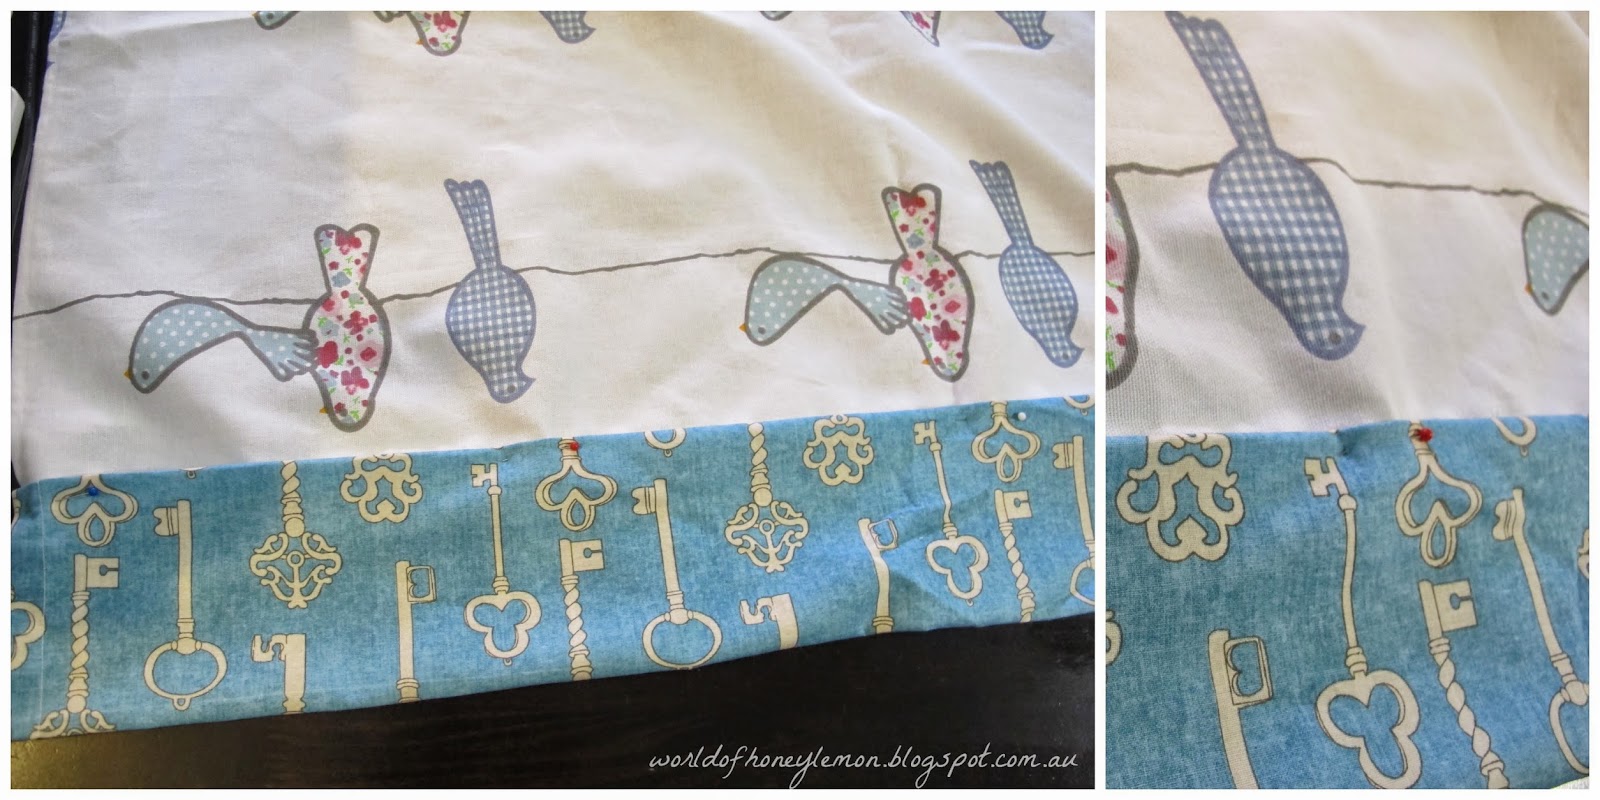
3. Pin the top fabric to the main fabric.

4. Sew the top fabric to the main fabric.

5. Hem the top fabric.

6. Fold the top fabric into half to make the casting for the rod and pin.


7. Sew the top fabric to the main fabric with a straight stitch.

Viola! Finished curtains.


Happy Sunday!


Wednesday, 25 June 2014

First ever RAce 2 the Altar Brisbane ed.

Race to the altar was held first time ever in Brisbane.  It was an easy version of Amazing race but was super duper fun to join.  Best thing was the profits from the entry fee will be donated to the Heart Foundation.  Cost to join was $70 per couple.  The prize that all couples are racing towards was worth over $30,000.  Unfortunately, there weren't too many entries this year probably because not too many people were aware of the event.

This was where it all started: Spring in Brisbane City.


Every couple was given the official RACE TO THE ALTAR T Shirt.  There are also spot prizes for example best dressed couple.  This year we had Snow White, Prince Charming, Super Mario, Superbride and Supergroom.
So every couple will have 3 hrs to complete all the tasks on the list and get as many points as possible. But you will have to solve the puzzles to know where are the locations that the couples have to arrive to complete the tasks.  Try this one:


The followings are just a glimpse of some of the tasks we had to do:


It was an awesome day to spend with your partner whether you win or not.  An even bigger reward for the 3 lucky couples who won the major prizes.

Best thing is no one goes home empty handed.  Each couple got to bring home a special gift bag filled with goodies.


You can find all these vouchers from the lovely sponsors


A small Crabtree & Evelyn handcream from Butterfly Lounge (Florist):


And other little gorgeous gifts from various sponsors:


If you are interested for next year event, be sure to keep an eye on their website: http://racetothealtar.com.au

Bellabox Review June 2014

I am quite excited when I received my Bellabox last Friday at work.  The package was well packed and nothing is broken in the box.  There is a slight den on one of corner of the box but I guess that is why the box is made of good quality cardboard.  

One of the bonus items this month: The InStyle Australia Magazine June 2014 issue RRP$9.95
As someone pointed out online, we are well into June (20th June when I received it), it is actually considered as an outdated issue. 


Contents within the box:


This month introduction to the lovely products I received:


I decided to do something slightly different with this review by inviting 2 of my lovely friends to try out this month Bellabox products with me.  

1. Kora Organics by Miranda Kerr Hydrating Mask - Cult  100ml RRP $49.95 full size


This is the most exciting product this month.  I heard about this brand for over a year and never got a chance to try it. Our verdicts: lovely product and really hydrates your skin.
Aroma: mainly Sandalwood.  Really remind me of the spa salon where you get massage and facial.
Texture: quite watery and doesn't dry up.
Color: white with bluish tint
Pros: lots of organic ingredients
Cons: 6 months expiry.  Didn't refine my pores as claimed.


2. Mary Kay Mineral Eye Palette - Garden Sky - Color 10g RRP $23 full size


Our second Fav product:  These colors are just lovely especially on fair skin tone.  This is my first time using Mary Kay while one of my review panel used to work as a MK consultant years ago.  This is part of limited-edition Zen in Bloom Collection.
Pros: easy to apply and blend in.  Easy Colors to work with: sky blue, bronze, green.  Contains Vit A, C, E (claimed to help protect against wrinkle-causing free radicals).
Cons:  contains paraben.  Order online or contacting a MK consultant.


3. Grown Alchemist Vanilla & Orange Peel Hand Cream - Luxe 20ml RRP $9.95
Another lovely product.  The smell is just divine if you love citrus and it is non greasy.
Pros: no paraben. Lovely scent. Non-greasy.  Free delivery for online purchase at http://www.grownalchemist.com/
Cons: not the most moisturise hand cream I used
Bonus promo code to be used on their online store.  I already placed an online order and am waiting for my package with my bonus full size hand cream.


4. Herbal Essences Naked Shine 0 Essential 40ml sample x 2 valued at $1.89


Pros: pleasant smell. Good size. 
Cons: can't really smell the white tea and mint


5. Lavanilla The Healthy Fragrance - Fragrance sample 1.2ml sample valued at $1.90
Vanilla Grapefruit

Pros: strong vanilla scent.  All natural and Organic pure essential oils.  Antioxidants goji berry and kakadu plum. No paraben and other additives
Cons: very mature smell.  Can't smell the grapefruit. 


Bonus item:
Nutrimetrics Nutri-Rich Nourishing Masque 5ml sample valued at $2.60


So this month it was an awesome Bellabox for me. Whooping $99.24 value of products for $15. Making it even more exciting to see what is in my July Bellabox.

Stay tune for my next review which I hope to write next week on products that I found are quite similar to Bioterm Aquasource products.

Friday, 20 June 2014

How to make a Hessian/ Burlap Decorator Sack

One of my most recent DIY project using the beautiful Hessian fabrics (aka Burlap in US and Canada) to make this versatile sack.  It looks great as a decorator piece and fantastic for keeping all your items together while keeping your table/bench top clean of clutter.  


First step: Find a piece of Hessian fabrics.  
Nowadays, you can find different beautiful designs just like this one from Spotlight.
Cut to desire size using this Height:width ratio = 2:3


Second Step: Fold the fabrics in half widthwise and pin the right side together.


Third Step: Sew the side with zigzag stitches


Fourth Step:  Sew the bottom with zigzag stitches


Fifth step: Now this is most tricky step.  You have to fold and align the side stitches and the bottom stitches together one on top of another forming a peak with the corner.  Pin so that it is secure.


Sixth step: Sew zigzag stitches across.  I sew this one at 6cm from the peak.  Depending on the size of your sack you will have to move closer or further from the peak.  This is the so called "box corner" that enable the sacks stand up properly. Repeat on the other side and cut the extra fabrics.


Finally, you can turn the sack inside out and fold the top down twice to hide the raw edges.


This is one of easiest project you will ever come across.  
Give it a go if you have a spare 15 mins.

Happy weekend!


Thursday, 19 June 2014

Queen's birthday long weekend

Yeay! Long live the Queen.  And we got to have a day off on 9th June making it a 3 days weekend.

I kicked start the weekend with New Empire concert on Friday night at The Old Museum in Springhill.  They are an awesome band and the tickets were so cheap at $23 plus $3 booking fee or Door charge of $25.  Lisa from the Veronicas also performed as a special guest.  She is so petite.  Jeremy's vocal was awesome and love their meaningful lyrics.  My fav song, One Heart/Million voices, was the official theme song for 2012 summer Olympics on Australian TV.


My big accomplishment of the big Weekend - Baby's First Quilt.  It was an easy project but did take lots of love and patience.  If you are interested to make your own, check out the link: http://worldofhoneylemon.blogspot.com.au/2014/06/how-to-make-you-first-quilt.html


I also picked up lovely chocolates from Mayfield.  They have very interesting favour such as lemongrass and aniseed.  They are not too sweet and you can really taste the alcohol if it contains alcohol.


Big Homemade Breakfast before our big walk in Brisbane City.  
Look at the lovely organic avocado YUM~!


We visited the Jemima Wyman's exhibition at GOMA (Gallery of Modern Arts).
So bright and colorful.
This is actually at the Children Section.


You must try the Harlequin Hallway which has cameras that will respond to your movements and capture your images into an animated harlequin patterned wall.  I was wearing a red polo and blue denim short.  Can you spot it??


If you happen to be in Brisbane before 2 November 2014, you must visit this cool and interactive exhibition especially you have little ones.  They will surely enjoy the other activities available at the exhibition.


Saturday, 14 June 2014

How to make you first quilt

I love making quilt for newborns because I get to choose from different super cute fabrics and put them altogether.  It is simple and best of all made with love.  Knowing that every quilt is unique and they can be kept for life.
So I am going to show you how to make one of the simplest quilt ever.
Hardest thing you have to do is ....
Pick the fabrics you like to put on the quilt.

The following is the fabrics I chosen:
You can chose any fabrics, any arrangement you like.
I like to use 6 different fabric designs to make 5 columns and 6 rows.


Step 1:  Cut a square of 6 and half inch


Step 2: Align your first row


Step 3: Pin 2 squares with right side together and sew them together on one side
I usually sew 5 columns of 6 squares although it doesn't really matter whether you sew columns or rows first


Step 4: Sew the columns together.


Try to align them as accurately as possible


Front panel done.


Step 5: Cut the backing fabric to the size of the front panel


Step 6: Pin the three layers together


Step 7: Iron the ribbon half lengthwise.  Choose wider ribbon to make it easier to sew.  
Pin the ribbon to the border.


Corner is a little bit tricky


Step 8: Sew the ribbon to the border making sure the ribbon is lining up neatly top and bottom.


Finished product.